The following changes have been prepared and implemented:
1. Control Panel has been completely redesigned. We made it modern, readable and contrasting. Besides visual changes the new design also has a number of functional features. The new control panel has ten color schemes to choose from, not just one, and a special night template designed in dark colors for comfortable work in the dark. You can adjust the width of the sections side bar and width of the whole control panel. You also can enable a full-screen mode when working on devices with small screen sizes, hiding the browser bar and tabs to increase the working space of the panel. Each user of the Administration Panel can configure its custom look, its parameters and the color scheme. A special dual system for settings storage is used to save parameters of the panel. The settings are saved both on the server and locally in a browser providing unique features when using the control panel settings. Server-based saving of settings allows to avoid the "flickering" effect when applying the user"s custom design, and also to automatically apply selected settings when using another browser. Whereas storing the settings locally allows you to restore the selected settings after a parameters reset on the server, for example, in case of engine re-installation or after its global update. We hope that you will enjoy the new control panel. You can see a small demo of the new panel in the video above.


5. Now you can enable a function in Static Pages section of Control Panel which allows you save the location of a user on a website before editing or adding the page. It allows to return user back to the previous location. This feature is useful when there is a large number of pages or setting any search parameters. After editing the user will not have to search or go back to the needed page manually.
6. This feature allows you to choose the action right after you saved a page. You can choose between: "Add another page", "Edit page", "Go to list of pages". It allows you to go to the most frequently used actions in one click.
7. This feature allows you to choose the action during the editing right after the page is saved. You can choose between: "Back to page edit" and "Go to pages list." Thus, users who frequently save text of the page during editing can quickly go on edit after saving.


15. You can exclude certain static pages from the site search results. When adding or editing a page in Administration Panel, you can check "Exclude from search results" option for each static page separately.
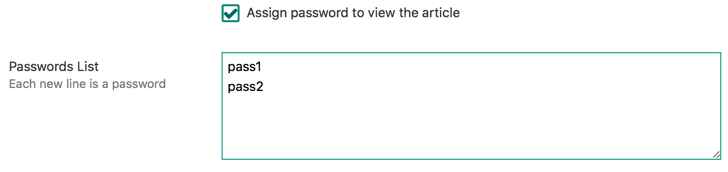
16. Now you assign a password or a list of passwords for each static page to view it. If a password is set for a static page, then password will be asked to open the page and it will be opened only if the correct password is entered. The entered password will remain in effect until the user closes the browser, and the password will not be requested again within the same session on the site.
17. Autosuggestion for extra fields which have the type of "cross-references" when adding and editing publications is added. Words list for autosuggestion is obtained from the database. It makes it easier to fill these fields in, and also reduces the probability of an error in words.
18. You can use masks to specify a template for redirects in Redirects module. When specifying URL to perform redirect from, you can specify the "*" character which means that any set of symbols may be instead of "*". E.g., you can specify /page/*/ to set redirect from pages like /page/1/, /page/2/, /page/any text/, etc.

20. For static page templates (static.tpl and other assigned pages), the new tag text is added, which displays the enclosed text as a link to edit the static page for user groups who are allowed to edit static pages. This allows to quickly move to editing the needed page, when there is a large number of static pages.
21. A new parameter "id_as_list" is added for custom articles tag {custom...} that works in conjunction with the "id" parameter, and sorts the publications as they appear in the list. For example, the tag {custom id = "3,4,1,2" order = "id_as_list"} will display articles first with ID 3, then 4, then 1, and 2. This feature is useful when you want to display the required articles in a strictly defined order.
22. A new parameter "id_as_list" is added for custom comments tag {customcomments...} that works in conjunction with the "id" parameter, and sorts the comments as they appear in the list. For example, the tag {customcomments id = "3,4,1,2" order = "id_as_list"} will display comments with ID 3, then 4, then 1, and then 2. This feature is useful when you want to display the required comments in a strictly defined order.
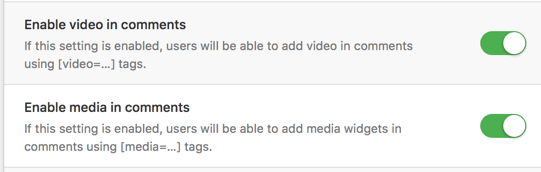
24. You can allow to attach media widgets in comments using the tags in user group settings . This option is used to allow or deny certain user groups to attach media widgets in comments.
25. Changes have been made to quick editing of articles. Now in quick editing mode only those fields are shown that were previously filled in during article adding or full editing mode. This applies to both the article annotation and full article fields. If the article annotation and full article fields have not been filled in, they will not be displayed in quick edit mode. This feature is useful for those who use only extra fields in articles. They will not see unnecessary fields.
26. You can remove such fields as "article annotation" and "full article" from the article addition template , while retaining all other functionality of editors. This feature will be useful for those who use just extra fields to add articles.
27. A new global tag for the {category-id} templates is added which allows to display the ID of the category viewed by the visitor. This tag will be useful when organizing the menu on the site and when you need to quickly reassign any CSS classes or the names of template files, when you edit articles display templates.
28. A new global tag {category-title} is added for templates , which allows to display the name of the category viewed by the visitor. This tag will be useful when you need to display the name of the category you are viewing.

{category-description} You can limit the output of this information using additional tags , for example, only on the first page of the category.
30. You can use a new "only" value for the "subcat" parameter of the output tag {catmenu ...} of the category menu , which allows to display only subcategories of the specified category. For example, if you use the {catmenu id = "1" subcat = "only"} tag, only the subcategories of the category with ID "1" will be displayed. This feature is useful to display only subcategories of a certain category. For example, you can automatically display a list of subcategories from the viewed category using the simple expression {catmenu id = "{category-id}" subcat = "only"} .

32. Now you can display the uploaded images separately for extra fields of "Image Gallery" type . For this the tag is used in templates, where "X" is the name of the extra field, and "Nr" is the number of image from the gallery. For example, if you apply , then image number two will be displayed and loaded into an additional field named "test". Thus, you can use one field, and at the same time display a preview from the gallery in one picture in article annotation, and full gallery when viewing the full article.
33. Now you can safely use {titlе} tag in HTML attributes when displaying articles. For example, you can use alt="{titlе}" and the text will preserve the validity of the document if the header contains quotation marks.
34. Support for attaching videos and posts from Facebook has been added for tag .
35. Gzip compression for CSS files used by the engine is added , which allows to significantly reduce the size of CSS files, and therefore to speed up the loading of pages. Compression can be enabled together with the compression of JS files in the engine settings. When you enable compression, only DLE engine’s own CSS files are compressed. To compress your own CSS files of your template, see our article https://dle-news.ru/tips/917-szhatie-css-fajlov-shablona.html
36. Now you can enable automatic reset of the browser cache for CSS and JS files used by the engine after its update . This feature allows the browser to use the newest files after the engine update, not use the old ones from the browser cache.
37. Tag {THEME} is now supported in promotional materials preview in the engine control panel.

39. If the protocol of your site is not specified in the engine settings , DLE will use a secure SSL connection and will generate links to HTTPS protocol starting from this engine version.
40. Preventive measures are added to protect the site from "endless" redirects if only HTTPS protocol is enabled in the engine settings and the server is not configured properly and does not transmit information about the used protocol.
41. Preventive measures are added for the word filter section to protect against accidental deletion of words from the word filter in Administration Panel . Now this action requires confirmation.
42. 403 HTTP code (access is denied) is sent to the browser for personal article bookmarks pages if an unregistered user goes to the bookmark address. Thus the page’s data will not be indexed by the search engines. Search engines are not indexing a page with just one access error.
43. The database load has been significantly reduced when displaying the latest comments on websites with a large number of comments.
44. The display of the tag cloud block is optimized for databases with a large number of articles on the site. The database query is improved and speeded-up.
45. Support for curly braces "{" and "}" in the "Word Filter" module is added and now you can use words containing these symbols in the filter.
46. Articles from the site map are automatically hidden from search engines if access to the article is denied for guests in "Access" tab of the article.
47. Froala and TinyMCE editors have been updated. Previously found issues are fixed in both of them.
48. HTML code parser for published articles is updated .
49. An issue with the incorrect CRON notification of search engines about the site map updates is fixed when the site name was specified without a protocol in the engine settings.
50. An issue is fixed where visual editors could not be displayed on the article publication page if there were "custom" tags on the page.
51. An issue is fixed where the visual editor could not load during quick editing if articles display was done only by {custom …} tag, without using the main {content} tag.
52. An issue is fixed where the merged text was sent without line breaks in e-mail notifications about new comments or personal messages.
53. An issue is fixed where line breaks were lost in empty lines when using the TinyMCE editor for articles.
54. An issue is fixed where some template tags for static pages were displayed incorrectly when displaying static pages in search results.
55. All previously declared and found small errors are fixed.
Information on the engine installation for clients:
Attention! This information is only available to users with a valid license for DataLife Engine. If you have already purchased the script, you must log in with your account.
If you are not a customer, you can on our website.
Привет, друзья. Я почти все свое время уделяю . Так как большинство моих сайтов построены на CMS DLE, то и приходится много работать с этим движком. Я и раньше говорил, что с SEO разработчики не дружат, и вообще такого слова не слышали никогда, но оказалось все еще хуже, чем могло бы быть. Я даже подготовил целую серию постов, посвященных «осеошиванию» народного движка (см. в категории ).
Но сегодня я бы хотел поговорить про такую важную вещь как html карта сайта для DLE. Сколько я не искал в интернете нормальный модуль карты, так и не нашел. Есть, конечно, несколько решений, но все они дают совсем не тот результат, который нужен, а порой даже наносят вред. Пришлось писать модуль самому, а точнее поручить профессионалам реализацию моих «хотелок». Выражаю огромную благодарность Фомину Александру за энтузиазм и невероятную скорость работы.
Модуль карты сайта для ДЛЕ, который я собираюсь вам представить, отвечает всем требованиям seo и предельно прост в установке.
SiteMap – модуль генерации HTML карты сайта для DLE
Оригинальное название:
SiteMap
Совместимость с CMS:
DLE 8.2-10.6
Распространение:
Бесплатно, As Is, при распространении ссылка на источник обязательна
Актуальная версия:
2.2 (от 08.05.2014)
Назначение:
Вывод ненумерованного списка со ссылками на все публикации, категории и статические страницы.
Особенности:
Визуальный генератор кода для вставки. Детальная настройка принципа вывода всех элементов сайта — новости, категории, статические страницы — количество выводимых элементов, принцип сортировки и порядок сортировки, отображение элементов в виде ссылки или простым текстом, возможность включить/исключить конкретные элементы.
Описание и настройка модуля HTML карты сайта для DLE
Друзья, 3 июня 2012 — это большой день, в свет вышла совершенно новая карта сайта версии 2.0. Мы поднимаем планку удобства использования нашего модуля на новый уровень. Реализованная в система визуальной генерации кода нам (надеюсь, и вам тоже) очень понравилась и мы решили внедрить ее и в модуль карты сайта. Теперь вам не надо читать руководства и описания всех функций и их значений — достаточно зайти в админку, указать несколько значений и все — модуль готов к работе!

Помимо сказанного выше, хочется перечислить еще несколько важных особенностей :
- модуль полностью кешируется;
- модуль использует API DLE;
- в карте не выводятся публикации, не прошедшие модерацию, а так же запланированные на будущее;
- учитывается наличие/отсутствие ЧПУ, а так же тип ЧПУ;
- предусмотрена такая тонкость – если кто давно работает с движком ДЛЕ, то помнит, что в ранних версиях вообще не было ЧПУ, а потом оно появилось, но только одного типа (такого же, как сейчас формируется тип 3). Так вот это тоже предусмотрено в данном модуле — новые публикации выводятся с url’ом, тип ЧПУ которого выбран в админке, а старые, соответственно, с url’ом ЧПУ старого типа.
Не смотря на появление визуального генератора, предлагаю ознакомиться с механикой модуля.
Модуль вставляется в шаблон main.tpl с помощью тега:
{include file="engine/modules/sitemap.php?param1=value1¶m2=value2"}
param1= — параметр модуля, value1 — значение параметра. Настройки модуля следуют после знака? и разделены знаком &.
Пример вставки (выводит карту сайта со списком статических страниц и новостями из категорий с id=2,3,4):
{content}
{include file="engine/modules/sitemap.php?show_static=1&need_cats=2,3,4"}
Для того, чтобы карта сайта отображалась на отдельной странице, тег {include ...} необходимо заключить в , а тег {content} заключить в . После этого модуль будет доступен по адресу http://site.ru/sitemap/
После любых изменений параметров и их значений необходимо очищать кеш в админпанели.
Параметры модуля, передаваемые через tpl при вставке:
- need_cats — список id категорий через запятую для вывода в карте
- exc_cats — список id категорий через запятую, исключаемых из карты
- need_news — список id статей через запятую для вывода в карте
- exc_news — список id статей через запятую, исключаемых из карты
- данные параметры бессмысленно указывать одновременно
- need_static — список id статических страниц через запятую для вывода в карте
- exc_static — список id статических страниц через запятую, исключаемых из карты
- данные параметры бессмысленно указывать одновременно
- cats_as_links — показывать названия категорий как ссылки (1 или 0)
- show_static — отображать в карте статические страницы (1 или 0)
- cats_sort — поле сортировки списка категорий (поле из таблицы dle_category)
- cats_msort — направление сортировки списка категорий (ASC или DESC)
- news_sort — поле сортировки списка статей (поле из таблицы dle_post)
- news_msort — направление сортировки списка статей (ASC или DESC)
- static_sort — поле сортировки списка статических страниц (поле из таблицы dle_static)
- static_msort — направление сортировки списка статических страниц (ASC или DESC)
- возможны 2 варианта направления сортировки:
- ASC — по возрастанию (по алфавиту)
- DESC — по убыванию (в обратном порядке)
- если поле и порядок сортировки не указаны — используются заданные настройки категорий или стандартные параметры DLE
- cats_limit — максимальное количество выводимых подкатегорий
- news_limit — максимальное количество выводимых статей из категории
- static_limit — максимальное количество выводимых статических страниц
Заметьте, ни одна из приведенных выше настроек не является обязательной , можно вообще ничего не указывать — достаточно просто вставить тег {include file="engine/modules/sitemap.php"} — тогда будут использованы настройки по умолчанию.
Внешний вид и классы стилей карты сайта
Опционально предусмотрено изменение внешнего вида карты сайта, для этого открываем файл стилей (style.css) своего шаблона и прописываем нижеописанные классы.
Перечень CSS классов карты сайта:
Sitemap_categories - элемент
- списка категорий
- списка категорий
.sitemap_items - элемент- списка статей
- списка статей
.sitemap_static_pages - элемент- списка статических страниц
- списка статических страниц
Root - класс для вышеперечисленных элементов, находящихся в корне списка
Sitemap_categories a - элемент c названием категории
.sitemap_categories span - элемент c названием категории
.sitemap_items a - элемент c названием статьи
.sitemap_static_pages a - элемент c названием статической страницыУстановка, удаление и обновление модуля карты сайта на DLE
Установка модуля
- Распакуйте архив с модулем;
- Скопируйте содержимое папки uploads (кроме /templates/) на сервер;
- Содержимое папки uploads/templates/Default/ поместите в папку своего шаблона;
- Запустите файл http://site.ru/sitemap_installer.php и следуйте инструкциям;
- Удалите файл sitemap_installer.php с сервера;
- Зайдите в админпанель, выберите модуль SiteMap и сгенерируйте код;
- Откройте файл main.tpl своего шаблона и найдите:
RewriteEngine On
Ниже добавьте:
$metatags = <<
Выше добавьте:
if ($do == "sitemap" ) { $nam_e = "Карта сайта" ; $metatags [ "title" ] = "Карта сайта {$config["home_title"]} " ; $metatags [ "description" ] = "Карта сайта {$config["description"]} " ; $canonical = "" ; } if ($do == "sitemap") { $nam_e = "Карта сайта"; $metatags["title"] = "Карта сайта {$config["home_title"]}"; $metatags["description"] = "Карта сайта {$config["description"]}"; $canonical = ""; }
- Процесс установки завершен — карта сайта доступна по адресу http://site.ru/sitemap/
Удаление модуля
- Загрузите файл sitemap_uninstaller.php на сервер (в папку где установлен DLE);
- Запустите файл http://site.ru/sitemap_uninstaller.php и следуйте инструкциям;
- Удалите все файлы модуля, загруженные при установке;
- Отмените все правки файлов движка (main.tpl и.htaccess), внесенные при установке;
- Не забудьте удалить файл sitemap_uninstaller.php.
Обновление модуля
- Скачайте новую версию модуля со страницы http://сайт/blog/post/1974
- Распакуйте архив с модулем.
- Скопируйте содержимое папки upload (кроме файла sitemap_installer.php и папки /templates/) на ваш сервер, отвечая «Да» на вопросы вашего FTP-клиента о замене существующих файлов.
Внимание! Для обновления с версии v.1.x до версии v.2.x:
Необходимо полностью скопировать новые файлы из версии 2.x на сервер, при совпадении имен подтвердить замену. После этого необходимо запустить http://site.ru/sitemap_installer.php и следовать инструкциям. На этом обновление завершено.Скачать модуль HTML SiteMap для DLE
История версий (History Log)
- v.2.2 — 08.05.2014
- Полностью переработано оформление модуля для всех версий DLE.
- Исправлены мелкие ошибки и произведены улучшения. Обязательно при обновлении проделайте пункт с правкой файла engine.php в инструкции по обновлению.
- v.2.1.1 — 17.04.2014
- Обновлен код модуля для совместимости с новым форматом файла настроек DLE версии 10.2 и выше.
- v.2.1 — 08.10.2012
- Исправлен баг в генераторе кода.
- Исправлены опечатки в админке.
- v.2.0 — 03.06.2012
- Добавлен установщик.
- Появилась админка с генератором кода для вставки в шаблон.
- v.1.2 — 02.06.2012
- Введен контроль за версией DLE.
- Модуль теперь совместим с линейкой DLE 8.2-9.6.
- v.1.1 — 02.11.2011
- Устранены баги с некоторыми функциями модуля.
- v.1.0 — 16.03.2011
- Официальный релиз.
FAQ — ответы на часто задаваемые вопросы
Q: Зачем мне две карты сайта xml и html? В чем их отличие? Можно ли их использовать одновременно?
A: Это совершенно две разные сущности: xml-карта сайта предназначена только для поисковиков. html-карта сайта предназначена для пользователей для навигации по сайту. Их можно и нужно использовать одновременно.Q: Какую карту сайта надо добавить в панель вебмастера Яндекс и Google?
A: Поисковикам необходимо «скормить» именно xml-карту сайта, а не ту карту, что создает данный модуль.Q: Ссылку на какую карту сайта можно поставить на сайта (например, в футере)?
A: Ссылаться нужно только на html-карту сайта, т.е. ту, которая создается данным модулем и доступна по адресу http://site.ru/sitemap/Q: У меня возникла следующая ошибка, что делать?
Fatal error: Cannot redeclare class Sitemap in /.../engine/modules/sitemap.php on line 55
A: Воспользуйтесь альтернативной установкой карты сайта через статические страницы — метод описан тутQ: Работает ли данный модуль на DLE 10?
A: Да, все работает нормально. Но если у вас возникли какие-то трудности, то есть еще один альтернативный вариант. Спасибо пользователю под ником Ryan — метод описан тутQ: У меня очень много публикаций на сайте, и все эти ссылки выводятся на одной странице. Это же лажа, Яндекс ругается!
A: Да, Яндекс ругается. Чтобы сократить количество ссылок на странице, воспользуйтесь параметром ограничения вывода количества новостей news_limit (см. подробности в списке параметров).Q: Сколько ссылок на странице карты можно/нужно выводить?
A: Из официального ответа службы поддержки Яндекса: рекомендуемое количество ссылок в html карте сайта не должно превышать 3000 ссылок.Q: А как же разделение карты сайта на страницы? Сделайте пожалуйста.
A: Постраничная разбивка карты сайта не подразумевается структурой БД и логикой модуля. В ближайшее время возможность разбивки на страницы не предвидится.Вот я вам все и рассказал, прошу скачивать, тестировать и писать отзывы. Если найдете какие-то ошибки — пишите, все максимально оперативно будем править. Так же если есть какие-то пожелания по поводу функционала, доработок, тоже пишите, все обсудим и сделаем!
DISCLAIMER В последнее время замечено распространение данного модуля на различных сайтах, посвященных DLE, под другими названиями, с измененным кодом, удаленным/измененным копирайтом и т.д. Но, тем не менее, признаки того, что это именно данный модуль и разработан Александром Фоминым, остаются. Так вот — я не несу ни какой ответственности за дистрибутивы, скачанные с других сайтов.
С уважением, Александр Алаев
Здравствуйте. Данный топик хочу посветить созданию простейшего модуля для популярной CMS Datalife Engine . В России, как впрочем и в странах СНГ она пользуется достаточно большой популярностью, однако на хабре статей об этой cms почему-то до сих пор нету. Я попытаюсь исправить это недоразумение. В этой статье вы узнаете о том, как сделать простейший модуль для этой CMS, а также познакомитесь со структурой движка.
Введение
Хотелось бы отметить, что система пользуется спросом у сайтов развлекательной тематики. Оно и понятно, система проста в использовании, имеет достаточное количество модулей и шаблонов. Да и почти все нужное есть «из коробки». Однако бывает, что чего-нибудь не хватает. Эту проблему мы постараемся решить.Почему DLE?
Вы наверняка заинтересуетесь, почему я выбрал именно эту CMS. Ответ простой: достаточно логичная структура самого движка, отделение шаблонов от кода, довольно простой шаблонизатор, опять же довольно логичное размещение всего внутри - легко разобраться что к чему. Плюс к этому система остается относительно легкой и удобной. Она не так функциональна как, например, Друпал, но все же мне она нравится.Структура
Для начала нам нужно знать кое-что о структуре движка. Нельзя творить на сервере бардак, поэтому мы будем хранить все в своих папках.Модули для работы движка принято помещать в папку /engine/modules/ .
В папке /engine/inc/ находятся файлы панели администратора.
Начиная с версии 8.х появилось подключать модули прямо в шаблоне. Шаблон находится в папке /templates/имя_шаблона/. В этой папке есть файл main.tpl Это корневой файл шаблона, обычно в нем расположена основная структура шаблона. Обычно модуль можно подключить так:
{include file=«engine/modules/mod_category.php»}
Где mod_category.php – файл, находящийся в категории /engine/modules/. Думаю с этим все понятно, поехали дальше.
Давайте сделаем модуль для вывода последних комментариев с кэшированием. Для этого создадим файл в папке /engine/modules/ и назовем его mod_lastcomm.php Далее я привожу листинг кода этого файла с подробными комментариями.
Код
DATALIFEENGINE". Эта константа определяется в index.php и ее значение TRUE символизирует о том, что файл подключен с помощью include/require, а не просто запущен. */ if(!defined("DATALIFEENGINE")) { die("Hacking attempt!"); } /* Подключаем класс api, для того чтобы нам можно было использовать функции для работы с кэшем. */ include ("engine/api/api.class.php"); /* Пытаемся прочетать информацию, сохраненную в кэше с именем lastcomm. Рекомендую давать осмысленные имена всему тому, что мы сохраняем в кэше. По сути lastcomm – это файл в папке /engine/cache/, а 60 – это время жизни кэша в секундах. В данном случае, если с создания файла прошло больше времени, чем 60 секунд, то нам снова придется лезть в бд. */ $lastcomm=$dle_api->load_from_cache("lastcomm", 60); /* Проверяем – есть у нас кэш или нету. Если нету, то лезем в бд. */ if (!$lastcomm) { /* Собственно запрос в бд. Он выполняется с помощью функции класса $db. Константа PREFIX содержит префикс, указанный при установки cms. Названия столбцов названы вполне нормально, я думаю не нужно объяснять что они делают. Индефикатор запроса заносим в переменную $sql. */ $sql = $db->query("SELECT comments.post_id, comments.text, comments.autor, post.id, post.flag, post.category, post.date as newsdate, post.title, post.alt_name FROM " . PREFIX . "_comments as comments, " . PREFIX . "_post as post WHERE post.id=comments.post_id ORDER BY comments.date DESC LIMIT 0,20"); /* С помощью функции get_row() класса $db считываем последовательно каждую строку из результатов выборки. Информация заносится в массив $row с индексами равными именам полей таблиц */ while ($row = $db->get_row($sql)) { /* Если нужно обрезаем заголовок новости */ if (strlen($row["title"]) > 50) { $title = substr($row["title"], 0, 50)."..."; } else { $title = $row["title"]; } /* Формируем ссылку на профиль пользователя. Аналогично */ $aname=urlencode($row["autor"]); $name= "". $row["autor"] .""; /* Формируем текст комментария и если надо обрезаем его */ $text = htmlspecialchars($row["text"]); if (strlen($text) > 1024) $text= substr($text, 0, 1024)."..."; /* Формируем ссылку на новость. Массив $config содержит все настройки системы. В частности $config["http_home_url"] - это урл домена. */ $newslink = $config["http_home_url"].$row["post_id"]."-".$row["alt_name"].".html"; $hint = "onMouseover=\"showhint("$text", this, event, "");\""; $title = "".stripslashes($title).""; /* Итоговая запись для одного комментария */ $lastcomm.="От $name в новости:
$title
"; } $db->free(); /* Кэшируем полученные данные. Чтобы получше разобраться с функциями кэширования, откройте файл "engine/api/api.class.php" там отлично все закомментировано */ $dle_api->save_to_cache ("lastcomm", $lastcomm); } /* Выводим полученный результат */ echo $lastcomm; ?>Заключение
Данный код полностью рабочий. И в нем конечно же есть недостатки. Например не проверяется для ссылок - включено ли ЧПУ. Или при переходе по ссылке на профиль пользователя мы попадаем сразу в его профиль, а не на окошечко jQuery с краткой информацией. Вообщем есть что доработать. Но все эти вещи не были включены сюда только по одной причине - не дать запутаться новичку. Также советую проанализировать другие файлы, например topnews.php. Если у вас возникнут вопросы по написанию модулей или вообще по системе - я с радостью отвечу на них.На этом у меня все, если эта тема кому-нибудь покажется интересной, то я сделаю цикл статей про cms Datalide Engine (DLE).
Ах да, это моя первая статья на хабре, поэтому извините если что не так.
DLE или DataLife Engine – это платная CMS для управления контентом вашего сайта. CMS обладает мощной системой управления новостями, публикациями, статьями, пользователями и предназначена для создания информационных порталов и блогов. Благодаря множеству встроенных функций и использованию продвинутой технологии AJAX в работе CMS, ваш сайт будет потреблять меньше ресурсов сервера даже при большом количестве посетителей. В данном руководстве вы узнаете, как установить DLE на Hostinger.
Перед тем, как вы начнете это руководство, вам понадобится следующее:
- Доступ к панели управления вашим хостингом
Как установить DLE на Hostinger
Перед тем как начать установку DLE вам необходимо произвести данные действия:
Шаг 1 - Скачивание установочных файлов DLE
Откройте папку upload в вашем FTP-клиенте и загрузите все файлы из папки на вашу учетную запись хостинга в каталог public_html .

ЗАМЕТКА! В этом руководстве для загрузки файлов мы используем FileZilla, но вы можете использовать любой удобный вам FTP-клиент.
Шаг 3 - Установка разрешений для файлов
Установка DLE проходит в автоматическом режиме, все что вам нужно сделать это установить соответствующие права для нескольких отдельных папок и файлов, которые вы ранее загрузили на ваш хостинг аккаунт.
- Для начала установите права на запись для папки templates и всех вложенных в нее папок. Для этого нажмите правой клавишей мыши на папку templates в интерфейсе FileZilla и выберите опцию Атрибуты файла…

- Далее, в появившемся окне впишите в Числовое значение 777 для изменения разрешений на запись, поставьте галочку напротив Перенаправлять во вложенные каталоги и отметьте Применить только к каталогам .

- Далее, необходимо провести изменение разрешений для всех файлов в папке templates , но уже с правами 666. Для этого вновь откройте атрибуты папки templates и задайте Числовое значение 666, поставьте галочку напротив Перенаправлять во вложенные каталоги → Применить только к файлам.

- Идентичные действия проведите с папками backup, uploads , а также для всех папок, находящихся внутри них. Далее для папок /engine/data/,/engine/cache/, /engine/cache/system/ . Для всех указанных каталогов установите права для записи 777.
- Теперь можно приступить к установке DLE.
Шаг 4 - Установка DLE на Hostinger
Для начала установки введите имя вашего домена в браузере. Если окно установки не выходит автоматически, добавьте к имени вашего домена install.php. К примеру, ваш-домен.ru/install.php.
- Если все сделано правильно, то вы увидите окно Мастера установки DataLife Engine. Нажмите кнопку Начать установку .

- Далее, примите пользовательское соглашение поставив галочку напротив Я принимаю данное соглашение . Для продолжения установки нажмите кнопку Продолжить.

- В следующем окне проверьте, что ваш сервер соответствует необходимым требованиям и нажмите кнопку Продолжить .

- Далее, проверьте правильность установленных ранее вами разрешений для файлов. Если все правильно, снова нажмите Продолжить .

- В новом окне вам необходимо заполнить детали вашей базы данных и данные для учетной записи администратора вашего сайта DLE.

- URL сайта – адрес вашего сайта
Данные для доступа к MySQL серверу.
- Сервер MySQL – MySQL сервер вашей базы данных на хостинге. Если вы являетесь пользователем Hostinger, вы можете найти необходимую информацию в разделе Базы Данных → Базы Данных MySQL .
- Имя базы данных – имя вашей базы данных MySQL.
- Имя пользователя – имя пользователя назначенного для вашей базы данных.
- Пароль – пароль от учетной записи пользователя вашей базы данных.
- Префикс – префикс таблиц базы данных MySQL. Можете оставить без изменений.
- Движок базы данных – рекомендуется оставить значение по умолчанию. InnoDB.
- 4 байта UTF – при включении данной опции DLE будет сохранять в базе данных дополнительную информацию. Это опция может повлиять на производительность вашего сайта.
Данные для доступа к панели управления.
Введите данные для доступа к панели управления вашим сайтом. Введите свой настоящий адрес электронной почты, он будет использоваться для восстановления доступа к аккаунту администратора.
Дополнительные настройки.
Включить поддержку ЧПУ – включить человеко-понятный URL. При включении данной опции в адресе статьи будет отображаться ее название. Данная функция полезна для SEO оптимизации.
- Для избежания повторного запуска установки или обновления, удалите файл install.php и папку upgrade из каталога вашего сайта. Нажмите кнопку Продолжить .

Поздравляем, установка DLE для вашего сайта на Hostinger прошла успешно.

Заключение
Закончив данное руководство вы узнали, как установить DLE на хостинг. Установка DLE – это довольно легкий процесс, если вы внимательно следовали нашему пошаговому руководству. Несмотря на обилие CMS на сегодняшний день, DLE имеет свои особенности и хорошую производительность.
Исключительно в ознакомительных целях. Администрация не несет ответственности за его содержимое. Скачать бесплатно .
Дорогие друзья,
Представляем вам новую версию нашего скрипта DataLife Engine v.13.1 NULLED. В данном релизе вас ожидает добавление поддержки автоматического обновления плагинов на новые версии и ряд других улучшений в системе плагинов, добавлены новые возможности для более удобной работы с дополнительными полями, добавлен новый тип рейтинга "Нравится и Не Нравится", улучшенный поиск публикаций в админпанели, и многое другое, об этом и другом читайте подробнее...
Были подготовлены и реализованы следующие изменения:

1. Добавлена возможность автоматического обновления скрипта в админпанели в пределах одной версии скрипта, в случаях, когда выходят, например, исправления найденных уязвимостей или других багов. В случаях, если в пределах одной версии вносятся изменения в дистрибутив, например, при выходе исправлений уязвимостей, или других выявленных проблем со скриптом, в админпанели возможно будет обновить скрипт, в рамках данной текущей версии скрипта.
2. Добавлена возможность автоматического обновления плагинов на сайте . Для этого в плагине задается URL для получения информации о наличии новой версии. По данному URL сайт разработчика плагина должен отдавать массив в JSON формате, который должен содержать информацию о актуальной версии плагина, а также ссылку на загрузку актуальной версии плагина. Например, по данному URL должно возвращаться значение {"version":"2.0","url":"https://dle-news.ru/test/test.zip"} . После чего, при проверке обновлений, администратор сайта сможет узнать о наличии новых версий плагина и обновить плагины в админпанели в один клик.
3. Для системы управления плагинами, добавлена возможность указывать количество замен, которые нужно провести, по каждому критерию поиска в файле. Например, вам нужно найти и заменить какой-либо код в файле, который встречается в этом файле несколько раз, вы можете указать сколько раз необходимо заменить данный код. Для замены всех вхождений этого кода, вы можете оставить данный параметр пустым, тем самым замена будет произведена везде, где встречается указанный вами код.
4. Для системы управления плагинами, добавлена возможность автоматического удаления загруженных вместе с плагином в архиве дополнительных файлов, в случае если плагин удаляется с сайта. Для этого в параметры плагина добавляется возможность выбора, удалять дополнительные файлы или нет. Тем самым вы можете самостоятельно решать, необходимо ли зачищать сервер от дополнительных файлов в случае его удаления с сайта, или же их необходимо оставить.5. Для системы управления плагинами, добавлена возможность использовать в именах папок, находящихся в ZIP архивах, тег {THEME}. При загрузке архива через систему плагинов, данный тег будет заменен на имя используемого шаблона. Например, разместив в архиве файл /templates/{THEME}/test.tpl, ваш файл шаблона будет помещен в используемый на сайте шаблон. Тем самым, при использовании сложных плагинов, которые содержат в себе примеры файлов шаблонов, они могут сразу загружаться в нужную папку, содержащую используемый пользователем шаблон.
6. Для системы управления плагинами, добавлена возможность использовать в действии "Поиск и замена" в строке замены управляющие символы функции preg_replace, такие как \\1 и т.д., что снимает ограничения на поиск и замену некоторых кодов в DLE.

7. Для дополнительных полей, имеющих тип "Изображение" и "Галерея изображений" , добавлена возможность назначать каждому изображению в отдельности, свое персональное описание, которое также используется в качестве HTML атрибута alt, при выводе данных дополнительных полей на сайте.
8. Для дополнительных полей, имеющих тип "Галерея изображений", добавлена возможность изменять порядок сортировки загруженных картинок, просто переместив их мышью. После загрузки изображений вы можете поменять местами изображения по вашему желанию. Также загруженные изображения могут быть перенесены в другие дополнительные поля.
9. Для публикаций и комментариев добавлен новый тип рейтинга "Нравится и Не нравится", который ведет отдельный учет как количества лайков, так и количества дизлайков. Для этого для шаблонов вывода публикаций и комментариев добавлены новые теги: {likes} - который выводит количество лайков, {dislikes} - который выводит количество дизлайков, а также тег текст - который выводит текст, заключенный в теге, в случае если в настройках включен данный тип рейтинга.
10. В настройки профилей пользователей в админпанели, добавлена возможность устанавливать список категорий, в которые данному конкретному пользователю разрешено добавление публикаций. Это позволит, например, журналистам, вести личные рубрики, в которые другие журналисты (или часть из них) не имеют права публикации. Или наоборот - исключить журналиста из конкретной категории новостей, если он, например, в ней некомпетентен.11. В настройки профилей пользователей в админпанели, добавлена возможность устанавливать список доверительных категорий, в которые данному конкретному пользователю разрешено добавление публикаций без модерации. Такая персонализация позволит значительно более гибко разграничивать права, не создавая при этом кучу групп пользователей, в том числе и групп под каждого конкретного журналиста.

12. Для расширенного поиска публикаций в админпанели, в разделе редактирования публикаций, добавлена возможность выбирать где необходимо произвести поиск. Вы можете произвести поиск по всему контенту, можете отдельно по заголовкам, краткому описанию, полному описанию и дополнительным полям. Также существенно улучшены алгоритмы поиска, для более корректного нахождения публикаций.13. Для расширенного поиска публикаций в админпанели, в разделе редактирования публикаций, добавлена возможность поиска одновременно по нескольким категориям на выбор.
14. Для облака тегов добавлена возможность использования символов "&" и "#", что позволяет, например, использовать в облаке имена различных брендов, например, "H&M" и т.д.

15. В настройки скрипта в админпанели, добавлена возможность разрешения для администрации сайта авторизоваться на сайте при помощи социальных сетей. При включении данной настройки, пользователи, находящиеся в группе администраторы, также могут авторизоваться на сайте при помощи своих аккаунтов в социальных сетях.
16. В админпанели, в разделе редактирования комментариев, добавлена возможность поиска комментариев по тексту. В данном разделе вы можете произвести поиск необходимых вам для редактирования комментариев, по каким-либо ключевым словам. Тем самым редактирование комментариев становится более удобным.
17. В админпанели, в разделе управления перекрестными ссылками, добавлена возможность для массовых действий над ссылками, устанавливать замену "Только в статических страницах", а также "В статических страницах, новостях и комментариях".18. Для предосмотра баннеров в разделе управления рекламой в админпанели, добавлено подключение стилей вашего шаблона из файла preview.css. Тем самым вы можете видеть более правильное оформление вашего рекламного кода, в случае если он использует классы из вашего шаблона.
19. Для шаблона вывода кратких новостей (shortstory.tpl) добавлено использование тегов текст , которые выводят заключенный текст в них, в случае если публикации по данным критериям отсутствуют. Тем самым вы можете переназначить стандартное системное сообщение об отсутствии публикаций в каком-либо отдельном разделе сайта, сделав его уникальным, например, для каждого раздела сайта. Также данные теги можно использовать и в шаблонах, которые используются при пользовательском выводе публикаций с помощью тега {custom ...}

20. Для шаблона E-Mail сообщения, которое отправляется при восстановлении забытого пароля, добавлено использование новых тегов: {%losturl%} , который выводит только URL ссылки на сброс и генерацию нового пароля, а также {%ipurl%} , который выводит только URL ссылки на сброс блокировки по IP. Тем самым вы можете отдельно задавать нужное вам оформление в письме данных ссылок, например, в виде кнопок. А также вы можете, например, отказаться от вывода ссылки на снятие блокировки по IP, если не используете эту возможность на своем сайте.21. Улучшена система удаления категорий в админпанели . В случае если удаляемая категория, содержит в себе подкатегории, которые также подлежат удалению, то все действия для публикаций, которые содержат удаляемую категорию, будут автоматически распространены и на публикации, которые содержат также и удаляемые подкатегории. И к данным публикациям в подкатегориях, будут применены те же действия.

22. Для модуля "Фильтр по: IP, Логину или E-Mail" добавлена возможность добавления блокируемых адресов или логинов, или e-mail сразу целыми списками, а не по одному. Что существенно ускоряет процесс добавления, если у вас уже есть готовый список из того что необходимо заблокировать.
23. Для модуля "Фильтр по: IP, Логину или E-Mail" добавлена возможность редактирования уже существующих правил. Вы можете выбрать и отредактировать любое правило, без необходимости его удаления и повторного добавления.
24. Для модуля "Фильтр по: IP, Логину или E-Mail" добавлена возможность выбора одновременно нескольких или всех добавленных правил, и массовой разблокировки данных правил в один клик.25. Для модуля "Фильтр по: IP, Логину или E-Mail" добавлена поддержка использования IPv6 адресов, которые можно указать для блокировки доступа на сайт. Также добавлена возможность указания IPv6 подсетей для блокировки.
26. Добавлена возможность указания IPv6 адресов в профиле пользователя , с которых разрешена авторизация для пользователя. Также вы можете указать не только отдельный адрес, но и IPv6 подсеть.
27. Для модуля пользовательской сортировки публикаций на сайте , выводимых тегом {sort} добавлена возможность выставления сортировки для каждой конкретной категории, а не для всех категорий одновременно.
28. Для ссылок, публикуемых в публикациях, добавлена возможность использование в них блочных элементов, таких как "p", "div" и т.д. Что позволяет DataLife Еngine более точно и правильнее соответствовать стандартам HTML5.
29. Добавлена возможность добавления новых пользователей в панели управления DataLife Engine, при работе с панелью с использованием смартфонов.
30. Внесены изменения в работу древовидных комментариев . В случае если достигнута максимальная вложенность для ответов на комментарии, то в случае ответа на комментарий, данные ответы остаются в ветке обсуждения на максимальной вложенности. Ранее при достижении максимальной вложенности, ответить на комментарий было нельзя. Теперь возможность ответа остается в любом случае.
31. Для дополнительных полей, имеющих тип "Перекрестные ссылки" , добавлена возможность использования в значениях символа двойных кавычек, и символа амперсанда.
32. В случае если для шаблона E-Mail сообщения, которое отправляется при восстановлении забытого пароля, установлено использование HTML формата для данного письма, то ссылки, которые генерирует тег {%lostlink%} в этом шаблоне, будут формироваться уже в виде готового HTML кода, а не просто текстовые ссылки.
33. В настройки скрипта добавлена возможность установки сортировки публикаций по умолчанию, по количеству комментариев. Тоже самое было добавлено и для настройки критериев сортировки при просмотре каталога.35. Внесены изменения в работу дополнительных полей, в случае если поле имеет ограничения на добавление по группам пользователей. Если значение дополнительного поля было добавлено пользователем, имеющим на это право, а в последствии публикация редактируется пользователем, у которого нет прав на заполнение этого поля, то значение данного поля больше не очищается, а остается таким, каким его заполнил ранее пользователь, имеющий на это право.
36. Лимит на количество символов метатега Description для категорий увеличен до 300 символов . Максимальная длина соответствует теперь максимальной длине, установленной поисковой системой Google, для вывода данной информации в результатах поиска.
37. Улучшен поиск похожих новостей на сайте. Показ похожих новостей стал более релевантным по сортировки найденных публикаций.
38. Улучшена поддержка IPv6 адресов посетителей сайта. В некоторых определенных случаях полный адрес мог не помещаться в базу данных. Теперь длина полей зарезервирована согласно спецификации RFC 4291.
39. Улучшено формирование метатега og:description протокола Open Graph при просмотре полных новостей. Формирование происходит более корректно при использовании в качестве основного контента дополнительных полей для публикаций.
40. Улучшена работа системы безопасности DataLife Engine , с целью более корректной проверки данных на поддоменах, на некоторых хостингах, имеющий структуру поддоменов, в виде подпапок основного домена.
41. Добавлена поддержка протокола tel: для ссылок публикуемых на сайте при помощи BB тегов.
42. Обновлены визуальные редакторы TinyMCE и Froala до актуальных версий . Исправлен ряд выявленных ошибок в данных редакторах.
43. Исправлена проблема, с использованием в дополнительных полях профиля пользователей, полей с типом "Список", в которых использовались значения с использованием символа "|".
44. Исправлена проблема, при которой в разделе управления плагинами, если изменялось действие над файлом в меню, некоторые символы могли некорректно изменяться в указанных в полях значениях.
45. Исправлена проблема , при которой нельзя было использовать теги для внутренних страниц сайта, и разрешалось использование только для внешних сайтов.
46. Исправлена проблема , при которой нельзя было приступить к обновлению сайта на новую версию, в случае если сайт был в кодировке отличной от UTF-8 при этом логин или пароль администратора содержал в себе буквы, написанные на кириллице.
47. Исправлена проблема, при которой не появлялось всплывающее окно о поступлении новых персональных сообщений, если пользователь самостоятельно вышел из своего аккаунта на сайте, а после чего опять вошел в него спустя какое-то время.
48. Исправлена проблема, при которой не работало редактирование комментариев в панели управления скриптом, в случае если в настройках скрипта был включен TinyMCE редактор.
49. Исправлена проблема , при которой не отображалось количество дней, в течении которых можно добавлять комментарии к публикации, если такие лимиты были установлены в настройках скрипта в админпанели.
50. Исправлена проблема , при которой дополнительное поле, имеющее тип "Загружаемый файл", не отображалось на сайте в виде ссылки на скачивание файла, а выводилось простым тегом.
51. Исправлены обнаруженные и заявленные ранее небольшие ошибки в скрипте.
.sitemap_static_pages li - элемент - списка статических страниц
.sitemap_items li - элемент - списка статей
.sitemap_categories li - элемент